How to Convert BMP to PDF

Bitmap or BMP is an image file format commonly used by programs in various operating systems. Bitmap files store image data without any compression, and hence can be significantly larger in size than other graphic files' formats.
Icecream PDF Converter can be used to convert files from BMP to PDF. This application also supports conversion of files in various popular formats to and from PDF.
The below steps will tell you how to convert BMP to PDF format using Icecream PDF Converter.
Get Icecream PDF Converter
Download Icecream PDF Converter from the official website and as soon as the .exe file is fully saved, proceed with the program's installation. Run the setup file and follow the instructions given by the installation wizard. As soon as the confirmation message appears, the successful installation of the application is finished. Launch the program to begin BMP to PDF conversion.
ADD BMP files for further conversion
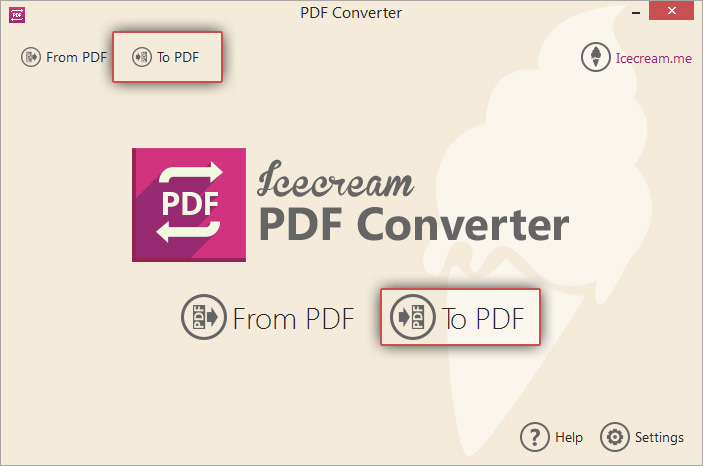
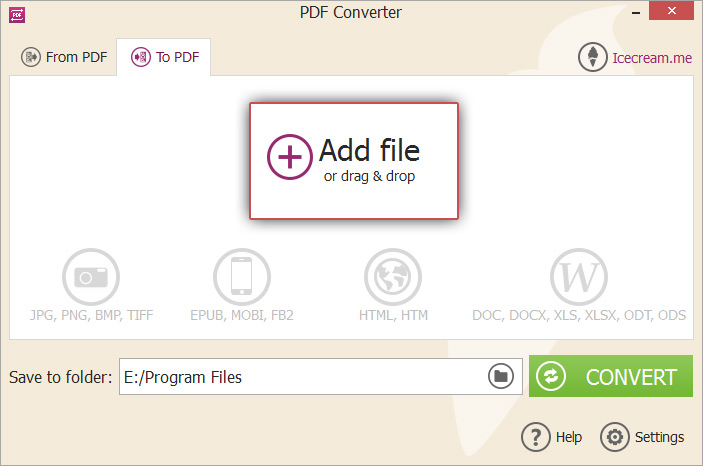
Click the “To PDF” button in the home screen of the program to start working in “To PDF” mode. To add your BMP files, select the “Add file” option to open Windows Explorer and browse for the files stored on your computer. For faster search you can filter files by their type: select “Images” to see graphic files only. Another way to add files for further BMP to PDF conversion is to drag and drop them to the window pane. All the selected files will appear in a queue.
Apply settings for the output PDF
To remove any file from the queue, click on the recycle bin icon beside the file. To remove all files at once, use the “Clear All” button in the bottom right of the window pane.
A new PDF file will be generated for each BMP file that is selected for conversion. If you wish to merge the images from all BMP files to a single PDF document, you can do so by ticking the “Merge all into one PDF file” option.
The images from individual BMP files will appear in the newly created PDF in the same order as they are listed in the queue (under condition that “Merge all into one PDF file” option is ticked). To reorder the sequence, use the UP and DOWN arrow buttons in the right hand side of the pane. Dragging and dropping files to the right position will also do.
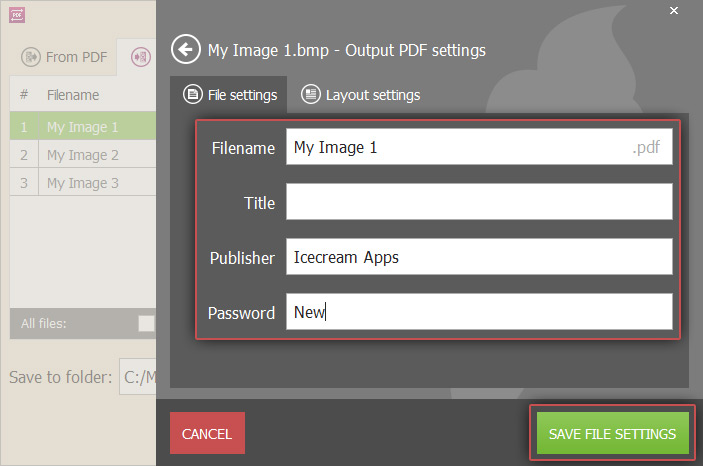
Clicking on the gear icon beside the file will open the settings panel, where you can specify file settings and layout settings for the output PDF file.
File settings panel offers the next options to configure: Filename (by default, the generated PDF file will have the same name as the corresponding BMP file. You can change this by specifying the required name in the filename field); Title (the title content in the PDF document); Publisher (publisher value of the output PDF document); Password (access to the PDF document can be restricted by specifying a password to open the file). Click “SAVE FILE SETTINGS” button to apply the new values for these settings.
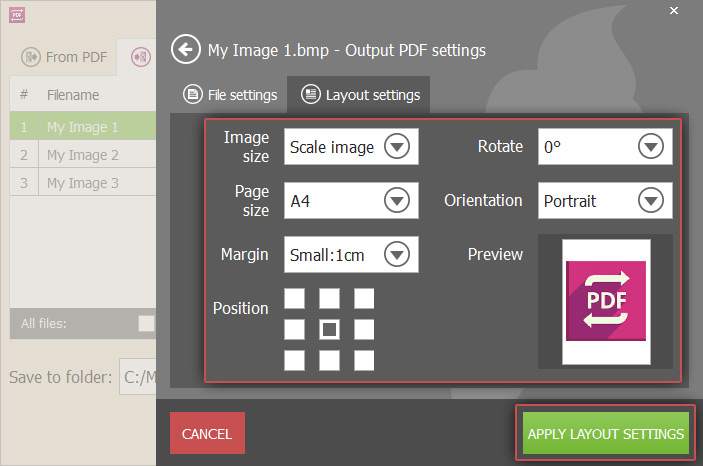
Layout settings panel is only available for images before their conversion to PDF. In the lower right corner there is a Preview area, where you can see all the changes that are being applied in this panel. The following values can be tweaked: Image Size (this field lets you select from two values: Original and Scale Image. Which means the size of the original image can be remained, or it can scaled to fit the size of the output PDF file page); Page Size (this field is for specifying the required page size of the future PDF document. There are several values to select from, such as A3, A4, A5, B5, Letter and Fit image); Margin (here you can select the margin size of the PDF document. There are 3 options: None, Small that is 1cm and Big that is 2cm); Position (this option is for selecting the alignment of the BMP images in the future PDF document); Rotate (specify the degree by which the image should be rotated in the PDF document); Orientation (select the page orientation: Portrait or Landscape). Hit “APPLY LAYOUT SETTINGS” button to save the changes in the above settings and click CLOSE to go back to the file queue.
The generated PDF files will be saved in the current user’s Desktop folder. To specify a different folder, click on the folder icon in the Save to folder area. Browse and select the required destination folder on your PC. All the generated PDF files will be saved in this folder.

Get ready to convert BMP to PDF
Now when all the files added and settings configured, you are ready to convert BMP to PDF format. Verify the selected files, the settings, file sequence etc. and hit the CONVERT button. A progress bar will be displayed with details of the status of conversion, the file being converted, the percentage of completion etc. You can pause, resume or cancel the conversion at any point of time using the Pause/Resume/Cancel icons.
After all files are converted from BMP to PDF, a confirmation pop up message will appear. Select the OPEN FOLDER option in the pop up to open the folder and view the generated PDF files.
You have now successfully completed BMP to PDF conversion using Icecream PDF Converter.

