How to Make Slideshows for YouTube

If you want to showcase your project and spread the word, there’s no better place to do that than YouTube. However, YouTube is for videos only, and if your content is represented by static images, you can combine them into a slideshow and upload it on YouTube as if it was a video.
Icecream Slideshow Maker is a special tool for creating simple yet good looking presentations. It offers a bunch of effects and useful features for successful work. The good news is the program is free and very easy to install and use. To learn more about the actual process, read this article on how to make slideshows for YouTube.
Download and install the program
There is a “Download” button on this page – click on it to start the process. First off, save a setup file on your computer and launch it. After that, you can skip to the installation – follow Wizard’s guidelines to complete it successfully. On the completion, simply launch the program and start using it according to the guidelines below.
Add photo/folder
To add a photo from your computer, click on the “Add photo” button in the upper left corner of the main window. The “Add file to start your photostory” button in the middle of the window works exactly the same. To import a folder with multiple photos, press the “Add folder” button.
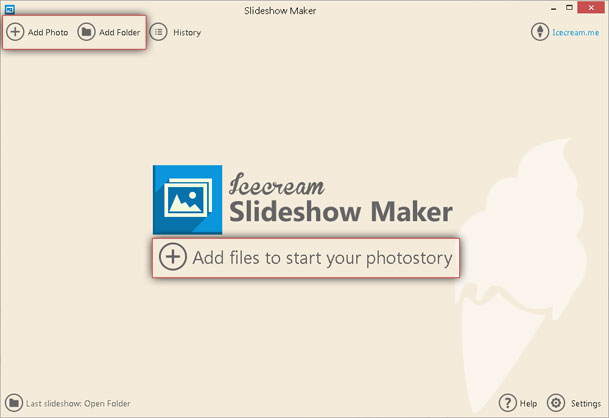
After that, you will be allowed to import the photo(s) from your hard drive using Windows Explorer. Icecream Slideshow Maker only recognizes files that are compatible with the program, i.e. images in JPG, JPEG, BMP, GIF, and PNG. If you want to import a folder with multiple images, the program will add the entire content of a chosen folder, including images in subfolders.
Configure the settings for slideshow for YouTube
After importing your files, the main window will change its appearance and be split into two sections. You can edit the queue and configure some settings for your files at the left side, and preview the presentation, set some additional configurations and work with audio at the right side.
- Start on the left side of the window. In here, you can move the imported files up and down by selecting them and using the arrows on the right. To delete a file from the queue, click on the recycle bin icon in front of it. After that, you can select the values for “Time” and “Transition” parameters by clicking on the default ones in the corresponding columns and choosing a necessary value from the dropdown menu. Configuring these parameters from this section, you are allowed to choose different values for each file. In case you want them to be equal for all files in the queue, take a look at the grey area under the queue – in here, you can choose the values that you want to apply to all of your files. Also, you can delete all of them from the queue by clicking on the “Clear list” button in this area. Check the line under this area – you’ll see a default title of your presentation. It looks like “sshow_yymmdd_hhmmss”, but you can change it if you want.
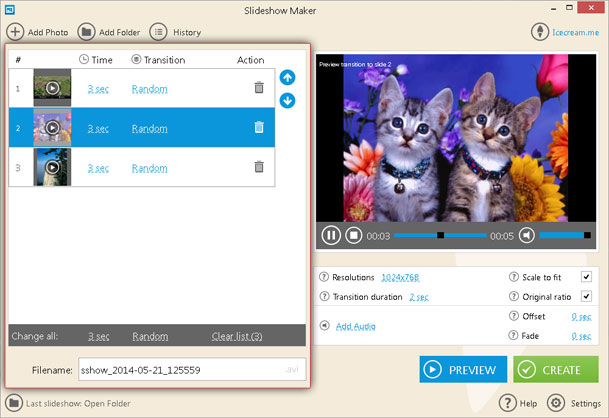
Now, you can move to the right side of the window and configure the rest of the settings. They will be applied to all your images automatically. Start with setting a value for the “Resolutions” option – simply click on a default one and change it to a desired resolution. After that, choose the transition duration for the specified effects. Check the “Scale to fit” box to adjust the photos’ size to your screen or the “Original ratio” box to keep the original width and height values of your images.
Finally, you can add an audio file to set it as background music. To do that, click on the “Add audio” button and import a song from your PC using a Windows Explorer. After that, choose an offset value for your presentation. The program allows you to set positive or negative offsets depending on your preferences. Then, specify the ‘Fade” value for your audio. If some of the settings’ specifics are unclear to you, point your cursor over the question mark in front of a setting and read more about it

Make slideshows for YouTube
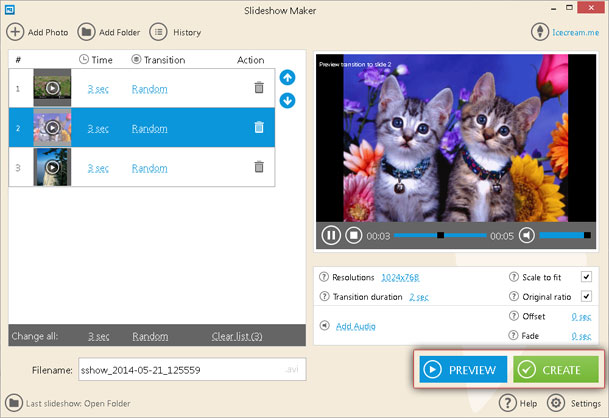
Now, you are ready to make slideshows for YouTube. Press the “Preview” button in the bottom right corner of the program and double check no corrections are needed. Finally, press the “Create” button to start the process. The duration may vary depending on the number of images and effects added and also on your computer’s characteristics, but typically it doesn’t take a long time. If you want to pause or cancel the process, simply click on the “Pause/Resume” or “Cancel” icons on the bottom of the window. When the presentation is created, you will see a popup window with the “Open folder” button on it. Clicking on this button will bring you to a containing folder where you can check your presentation.
Finally, you need to upload the video to YouTube. To do that, simply press the “YouTube” button. After that, the program will instantly upload the project on YouTube.
