- 28shares
- 28
 A computer operating system is an incredibly complicated thing. To work properly, they need hundreds or thousands of different files. But how to show hidden files if you faced this issue however you desperately need to access these files?
On Windows PCs, many of these critical files and folders are hidden from view by default. This prevents a careless user from accidentally modifying or deleting them, which could lead to dangerous errors.
Often, we have to look at these files for legitimate reasons. They are required for troubleshooting some issues. That said, we don’t recommend that beginners go messing around with hidden files – not unless it’s absolutely necessary and you can’t find a professional in time.
For instance, if you need to view hidden files inside the ‘Program Data’, ‘App Data’ or ‘Default’ User folders, it is necessary to make hidden files and folders visible.
If you are confident in your computer skills or are a power user, you should definitely know how to show hidden files on Windows 10, 8 or 7. There are, in fact, a couple of approaches to it.
So, let’s go over both for the most popular versions of Windows currently in use. We will even list instructions for how to see hidden files on Windows 11, for those of you who have jumped ahead and upgraded. However, before we start we strongly recommend you to use backup software of your choice to back up your important data just in case.
Here is how to show hidden files in Windows 10, 8, 7 and even 11:
Step 1: Open the Control Panel
The Control Panel is where all the important settings are located. Keep in mind that this is different from the Settings App founded in Windows 10 and newer versions. The Settings menu does not have file explorer settings, so make sure you are on the actual Control Panel.
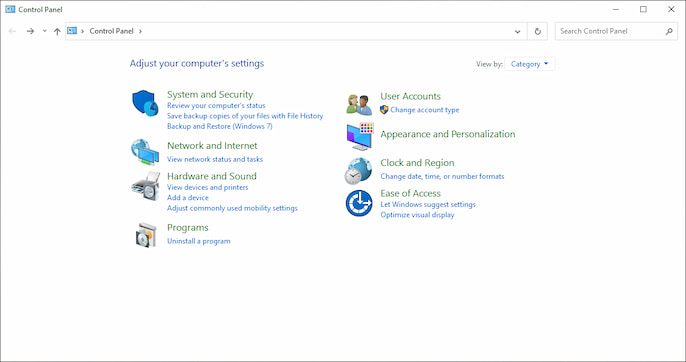
To launch the control panel, open the start menu and type ‘Control Panel’ into the search box. It should be the first result at the top of the list. Just click on it to launch it and proceed to view hidden files.
If your control panel does not look like the image, you can change the view using the ‘View By: ___’ dropdown menu on the top right. There are normally 3 options: Category, Small Icons and Large Icons. The image given below shows the Category view.
Step 2: Find the File Explorer Options
In Windows, the app/program for viewing all the files including hidden files is called the File Explorer. So, we are looking for the File Explorer settings. In the control panel’s category view, it will be under ‘Appearance and Personalization’.
Select ‘Appearance and Personalization’, then find the ‘File Explorer Options’ link. When you click it, it will bring up a separate, smaller pop-up window with various options and settings for the file explorer.
Step 3: Go to the View Tab
The File Explorer Options menu has 3 tabs: General, View and Search. The view settings are what we are looking for.

Under the ‘Advanced Settings:’ box, there will be a lot of options. You can set options for showing icons and menus, thumbnails, compact views, etc. Don’t get distracted by all these, though. The main option you are looking for will have a folder icon, labelled ‘Hidden Files and Folders’.
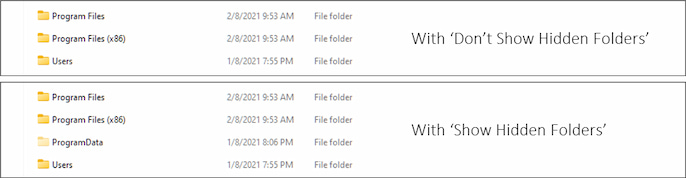
Under that, there are just two options: ‘Don’t Show-’, and ‘Show hidden files, folders and drives.’. By default, ‘Don’t Show’ will be selected. Simply change it to ‘Show’, then hit ‘Apply’.
Press ‘Okay’ to close the window, and you are done! You can now show hidden hidden files!
Step 4: Check if Hidden Files and Folders are Visible
If you want to check if the hidden files and folders have been successfully made visible, there is an easy way to check. Open the File Explorer and go to the C: drive where Windows is installed.
If you carried out all the steps successfully, a new folder named ‘Program Data’ will be visible just below ‘Program Files’! The icon of this folder will be semi-transparent to denote that it is normally a hidden folder.
That’s it! Now you know how to show hidden files. However, some alternative approaches are much easier to use. We will cover them now.
Alternative Way of How to Show Hidden Files on Windows 10, 8 and onwards.
The above method works for all versions of Windows. However, with newer versions, Microsoft has increasingly begun to make such options easier to access for users.
In Windows 8, 10 and 11, you don’t have to go through the control panel anymore. You can do so if you prefer it that way, but there is also an easier approach.
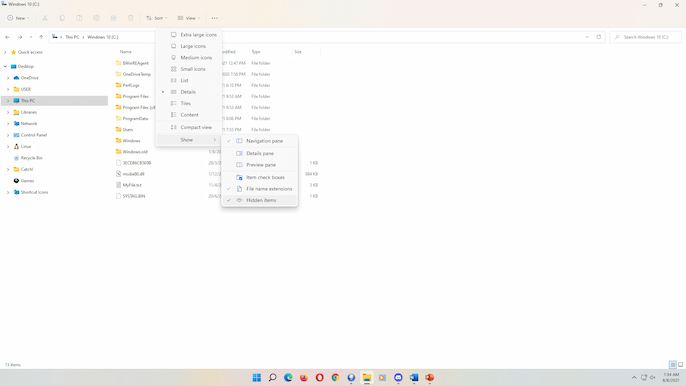
The updated file explorer now has a ribbon at the top with a variety of options. If this ribbon is not visible, then click on the small downwards arrow next to ‘?’ on the far-right corner.
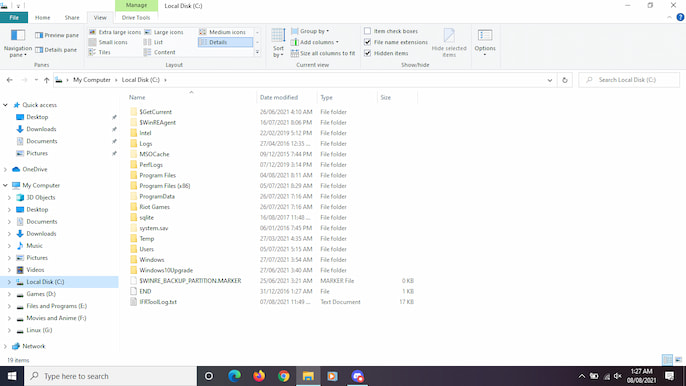
As you can see, on the right side in the ‘Show/Hide’ section, there is an option called ‘Hidden Items’. Checking that will make hidden files and folders visible.
In Windows 11, the interface has been updated to be more minimalistic. However, all the options are still available. Clicking on ‘View’ brings up a drop-down menu. At the bottom of the menu, inside ‘Show’, we have the ‘Hidden Icons’ option. Checking it will make hidden files visible.
Final Words
Now you know how to show hidden files on Windows. Be careful with this feature, as these files are hidden for a reason. Unless you are a power user, we advise leaving them hidden until necessary. If there is any issue that you are trying to troubleshoot or solve, then make the files visible and hide them again later when the job is done.
This is one of the biggest advantages of Windows PCs. On Linux computers, critical files are always in plain view, while on Mac, it’s the opposite – they are extremely difficult to access, this is one of the most distinctive features that is different in Mac and Windows. Windows occupies a very helpful middle-ground. Showing hidden files is a very useful tool, so use it wisely! Also, a general advice, make sure your computer drivers are always up to date. That’s how you can improve the productivity of your PC.