- 11shares
- 7
 With the recent update of Icecream Screen Recorder to version 3.0, we managed to add new awesome features to make the screen capture process more advanced in its options yet still simple in use. Our intention was to create a really powerful screen recording software that can offer the most to those who create screencasts, video tutorials and instructional videos. We’ve considerably increased the number of available recording features of the program so we decided to make a full list of them in order for you to get to know them better. If you’re curious how the screen recorder improved within a little over a year you can read our review of the 10 best features of Icecream Screen Recorder written in October 2014.
Zoom In/Zoom Out Tool
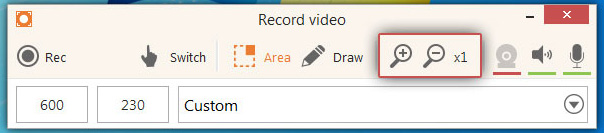
This was one of the most requested features — so here you go. Now it’s possible to zoom in and out of the selected recording area during the screen capture process. To zoom in/out, press the corresponding magnifying glass icon on the recording panel. The available zooming range is 16x; the current zoom value is shown on the recording panel near the zoom icons.
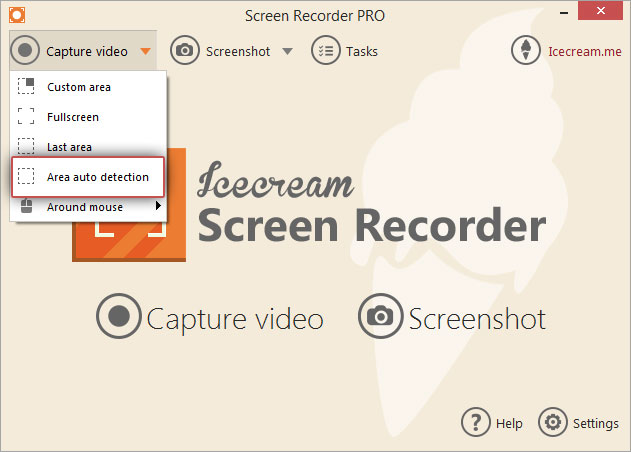
Area Auto Detection
Area auto detection mode is a great way to select the recording area. To do this, hover the mouse cursor over the “Capture video” button and select the Area Auto Detection option from the drop down list. While you are hovering the mouse over any program window, Icecream Screen Recorder analyzes its structure and offers to automatically set the frames of the recording area to fit the whole window or even blocks inside the area (banner or YouTube widget, for instance) by pressing the F1 button or orange logo shown next to the screen capture borders.
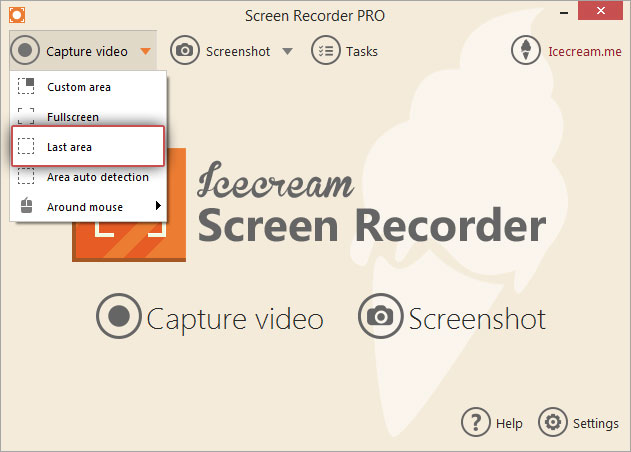
Last Area Selection
This feature works both in screen recording and screenshot-taking modes. To select the area previously used for screen capture/screenshot taking, hover the mouse cursor over the “Capture video” or “Screenshot” button and select the Last Area option from the opened drop down list. Right after that the program will automatically select the area last used in the selected mode.
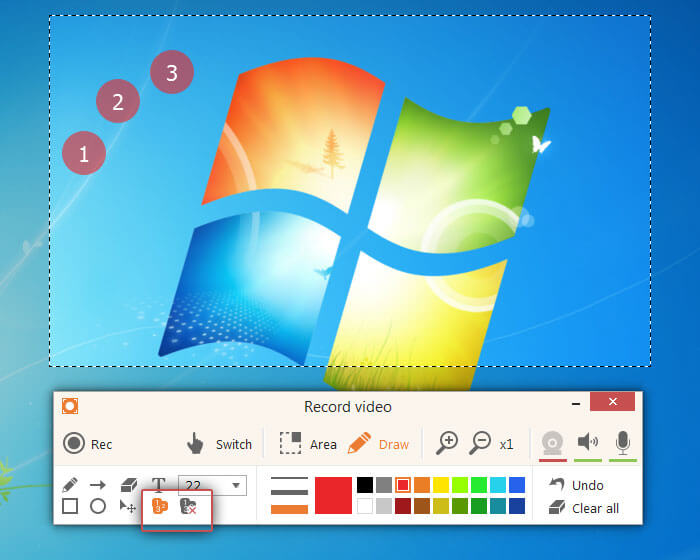
Step Tool
One of the most popular ways this screen recording software is used is to create tutorials. The Step Tool is a great graphic tool for adding numbered markers to any video guide. Click the Step Tool icon on the Draw Panel of the Recording Panel to activate this feature. After that, each mouse click within the selected recording area will add a numbered marker. To start counting from number 1, once again press the Step Tool reset button.
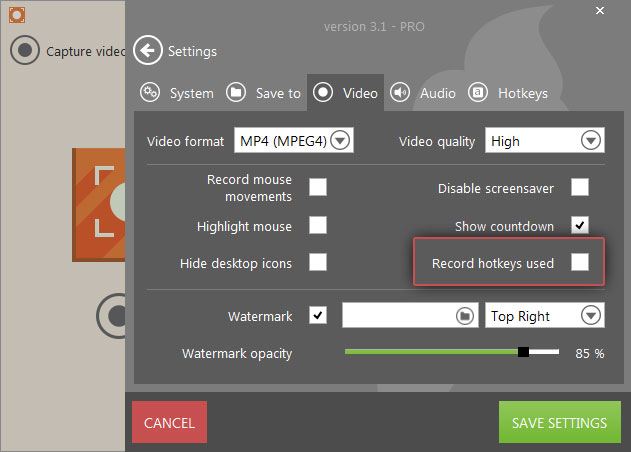
Display of Hotkeys Used while Recording
Again, this feature is highly convenient for those who use this screen recorder software for creating educational videos. All the hotkey combinations with Ctrl, Alt and Ctrl+Shift pressed during the screen capture process will be displayed in the lower-right corner of the output video. To enable this feature, tick it in the Video tab of program’s Settings.
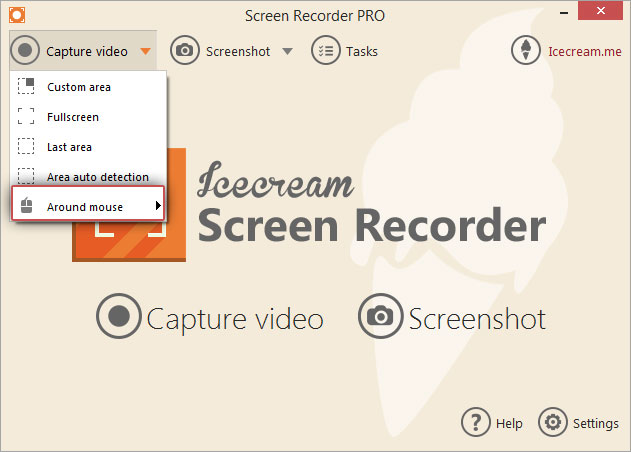
Around Mouse Recording
Around mouse recording mode lets you record video in the following way: select the size of the recording area (there are multiple presets available) and this area will be captured moving over the desktop and following the mouse cursor. To record a video in this mode, hover the mouse cursor over the “Capture Video” button and select the Around Mouse option from the drop down list.
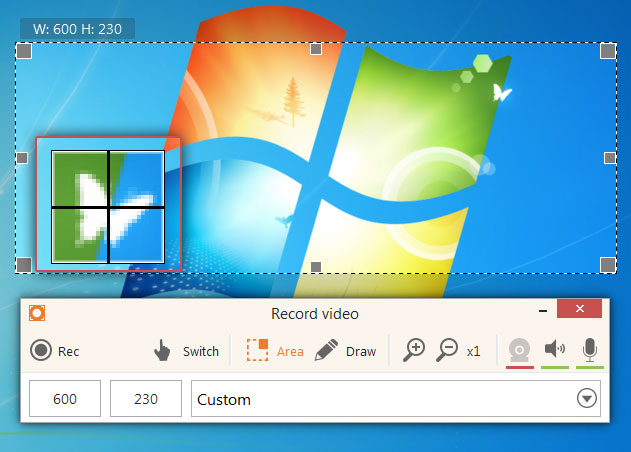
Magnifying Glass during the Recording/Screenshot Area Selection
For the most accurate Recording Area selection there’s a magnifying glass element that enlarges the area around the mouse cursor so that all the pixels are visible. Move the mouse towards the lines of the selected area to zoom into their position on the desktop. With the help of this feature there’s no way screenshot or video frames can be misplaced.
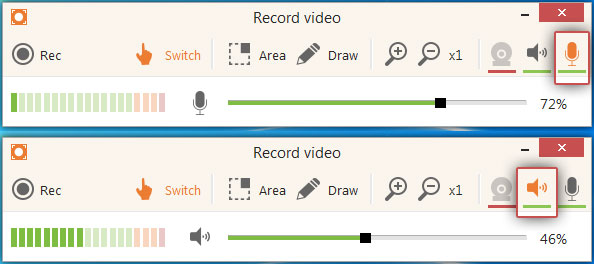
Audio and Microphone Volume on the Recording Panel
Adjusting the volume level of audio and the microphone can now completed not only through the program’s Settings, but directly from the recording panel of Icecream Screen Recorder during the screen capture process as well. On the right side of the panel, during the recording, there are sound and microphone symbols — press them to adjust the corresponding volume level or disable sound from certain devices.
Extend Web Camera to Fit Recording Area
In the previous versions of this screen capture software it was possible to add a webcam window to the selected recording area. The size of the webcam’s window can be altered by toggling the markers on the sides. Now, by double clicking the web camera’s window it will be scaled to fit the selected screen capture zone. Double click it once again to minimize the web camera’s window to the previously customized size.
Hopefully we managed to make Icecream Screen Recorder even more powerful while keeping it intuitive and easy to use. Even more improvements are to be added, so stay tuned for updates!
Can a timer be set to begin recording as well as stop recording?
Thanks
Hello Joe,
You can set both start and stop date and time with the scheduled screen recording option. Please take a look at the following tutorial: https://icecreamapps.com/Howto/how-to-schedule-screen-recording.html